Recently I found a new RTOS called NuttX and I was pleasantly surprised to see that is a powerful and flexible real time operating system. It can be used for 8 bit MCU to 32 bit MCU in a small footprint and implements the POSIX and ANSI standard.
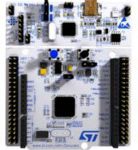
I found that NuttX integrates many features like (file system, network, device driver, flash support, graphic support, ...) and I decided to test it on a development board called Nucleo L476RG. The Nucleo L476RG is a interesting board because it's powered by a low power ARM® 32-bit Cortex®-M4 CPU and it has 1 Mb Flash and 128 kB of RAM which allows to be used for many applications. Another advantage is that the Nucleo board has on-board ST-LINK/V2-1 debugger/programmer which allows a confortable debug and programming interface.
More information about the NuttX RTOS can be found at the NuttX website
More information about the Nucleo L476RG board can be found at the ST Nucleo board website
First let's start to configure the development environment. I will use a virtual Linux machine (Ubuntu 16.04.2) to configure and install NuttX. The steps are quite simple, personally I fallow the tutorial on NuttX channel and everything was OK.
However, the steps to configure the development environment are :
- Install the Ubuntu 16.04
- sudo apt-get update && sudo apt-get upgrade
- apt-get install automake bison build-essential flex gcc-arm-none-eabi gperf git libncurses5-dev libtool libusb-dev libusb-1.0.0-dev
- mkdir ~/nuttxspace
- cd ~/nuttxspace
- git clone http://repo.or.cz/r/openocd.git
- cd ~/nuttxspace/openocd
- ./bootstrap
- ./configure --enable-internal-jimtcl --enable-maintainer-mode --disable-werror --disable-shared --enable-stlink --enable-jlink --enable-rlink --enable-vslink --enable-ti-icdi --enable-remote-bitbang
- make
- sudo make install
Now let's compile NuttX for Nucleo L476RG board:
- cd ~/nuttxspace/
- git clone https://bitbucket.org/nuttx/nuttx
- git clone https://bitbucket.org/nuttx/apps
- git clone https://bitbucket.org/nuttx/tools
- cd tools/kconfig-frontends/
- ./configure
- make
- sudo make install
- sudo ldconfig
- cd ~/nuttxspace/nuttx/
- make distclean
- cd tools/
- ./configure.sh nucleo-l476rg/nsh
- cd ..
- make
At the end of the compiled kernel you will find two files: "nuttx.hex" and/or "nuttx.bin" (however the extension of the final binary file can be configured with the "make menuconfig" in the graphic menu).
As everything went well, I hope for everyone, I will flash the "nuttx.bin" file on the board and test if NuttX run correctly.
Steps to flash code on the board using ST-Link/V2 .
These steps are made only one time:
- cd ~/nuttxspace/
- cd openocd/contrib/
- sudo cp 60-openocd.rules /etc/udev/rules.d/
- sudo udevadm trigger
Now, to test the communication with the ST-Link/V2 you must run :
- openocd -f interface/stlink-v2.cfg -f target/stm32l4x.cfg
Personally I get an error when I try the commande:
miti@ubuntu:~/nuttxspace/nuttx$ openocd -f interface/stlink-v2.cfg -f target/stm32l4x.cfg
Open On-Chip Debugger 0.10.0+dev-00167-g29cfe9c (2017-07-23-11:57)
Licensed under GNU GPL v2
For bug reports, read
http://openocd.org/doc/doxygen/bugs.html
Info : auto-selecting first available session transport "hla_swd". To override use 'transport select <transport>'.
Info : The selected transport took over low-level target control. The results might differ compared to plain JTAG/SWD
adapter speed: 500 kHz
adapter_nsrst_delay: 100
none separate
Info : Unable to match requested speed 500 kHz, using 480 kHz
Info : Unable to match requested speed 500 kHz, using 480 kHz
Info : clock speed 480 kHz
Error: open failed
in procedure 'init'
in procedure 'ocd_bouncer'
In order to avoid this problem I execute :
- openocd -f interface/stlink-v2.cfg -c "hla_vid_pid 0x0483 0x374b" -f target/stm32l4x.cfg
If you have something like that, than the communication with the ST-Link/V2 it's correctly established.
miti@ubuntu:~/nuttxspace/nuttx$ openocd -f interface/stlink-v2.cfg -c "hla_vid_pid 0x0483 0x374b" -f target/stm32l4x.cfg
Open On-Chip Debugger 0.10.0+dev-00167-g29cfe9c (2017-07-23-11:57)
Licensed under GNU GPL v2
For bug reports, read
http://openocd.org/doc/doxygen/bugs.html
Info : auto-selecting first available session transport "hla_swd". To override use 'transport select <transport>'.
Info : The selected transport took over low-level target control. The results might differ compared to plain JTAG/SWD
adapter speed: 500 kHz
adapter_nsrst_delay: 100
none separate
Info : Unable to match requested speed 500 kHz, using 480 kHz
Info : Unable to match requested speed 500 kHz, using 480 kHz
Info : clock speed 480 kHz
Info : STLINK v2 JTAG v25 API v2 SWIM v13 VID 0x0483 PID 0x374B
Info : using stlink api v2
Info : Target voltage: 3.255570
Info : stm32l4x.cpu: hardware has 6 breakpoints, 4 watchpoints
Now that everything worked, let's flash the "nuttx.bin" file on the board:
- openocd -f interface/stlink-v2.cfg -c "hla_vid_pid 0x0483 0x374b" -f target/stm32l4x.cfg -c init -c "reset halt" -c "flash write_image erase nuttx.bin 0x08000000"
Here is the result of the flashing code.
miti@ubuntu:~/nuttxspace/nuttx$ openocd -f interface/stlink-v2.cfg -c "hla_vid_pid 0x0483 0x374b" -f target/stm32l4x.cfg -c init -c "reset halt" -c "flash write_image erase nuttx.bin 0x08000000"
Open On-Chip Debugger 0.10.0+dev-00167-g29cfe9c (2017-07-23-11:57)
Licensed under GNU GPL v2
For bug reports, read
http://openocd.org/doc/doxygen/bugs.html
Info : auto-selecting first available session transport "hla_swd". To override use 'transport select <transport>'.
Info : The selected transport took over low-level target control. The results might differ compared to plain JTAG/SWD
adapter speed: 500 kHz
adapter_nsrst_delay: 100
none separate
Info : Unable to match requested speed 500 kHz, using 480 kHz
Info : Unable to match requested speed 500 kHz, using 480 kHz
Info : clock speed 480 kHz
Info : STLINK v2 JTAG v25 API v2 SWIM v13 VID 0x0483 PID 0x374B
Info : using stlink api v2
Info : Target voltage: 3.253997
Info : stm32l4x.cpu: hardware has 6 breakpoints, 4 watchpoints
Info : Unable to match requested speed 500 kHz, using 480 kHz
Info : Unable to match requested speed 500 kHz, using 480 kHz
adapter speed: 480 kHz
target halted due to debug-request, current mode: Thread
xPSR: 0x01000000 pc: 0x08000188 msp: 0x200017bc
auto erase enabled
Info : device id = 0x10076415
Info : flash size = 1024kbytes
target halted due to breakpoint, current mode: Thread
xPSR: 0x61000000 pc: 0x20000050 msp: 0x200017bc
Warn : block write succeeded
wrote 155648 bytes from file nuttx.bin in 8.874666s (17.127 KiB/s)
^C
Note : As you see I had to execute CTRL+C to exit the "openocd" program.
Here is a video that show NuttX running on Nucleo L476RG.
Or check the video on YouTube.
This video show how to change the build-in application using the make menuconfig.
Or check the video on YouTube.
4 Comments
Alan C. Assis · 18/08/2017 at 10:49 am
Hi Mihail,
I’m looking forward for new posts about NuttX !!!
Are you a teacher? If so, It should be share your experience about with your students and ask them to create projects with NuttX.
CMN_Lab · 18/08/2017 at 5:52 pm
Hi Alan,
Unfortunately I only work on this in my free time so it can take a while before I post new articles, anyway I do my best to came out with new articles about NuttX very soon.
Concerning my profession I’m a Freelancer Embedded System engineer.
Regards,
felix giffuni · 26/02/2018 at 1:36 pm
Excellent tutorial.Thank you very much.
Felix
CMN_Lab · 26/02/2018 at 3:00 pm
You welcome !
Mihail